To the next generation of our food blog!
please change your bookmark to www.urbanmonique.com - everything from here is now there, so... We'll see you there!
E & M
Monday, March 14, 2011

Thursday, March 10, 2011
Vegan Chili, Anyone?
My old friend Darcy writes, “Got any suggestions for an easy vegan meal? I am sick of my own cooking.”
We discovered she had some nice white beans about, so I suggested chili! Vegan sometimes gets a bad rap, but the fact is, it's great cooking and eating - Read the ingredients and you'll see there's nothing weird or funky about it; just simple, good ingredients well married!
Vegan Chili
2 cups each white, kidney, pinto, black, or garbanzo beans, (the more the merrier; I like at least three varieties, and white/black/garbanzo is my fave combo)
2 cups tomato, diced, crushed, or pureed as you prefer
1 sweet onion, diced
1 or 2 cobs of sweet corn
1 carrot, diced
2 cloves of garlic, fine dice
1 each red, orange, or yellow bell pepper
1 or 2 hot chile of your choice.
½ cup cilantro, chiffenade cut.
1 teaspoon Mexican Oregano
½ tsp Cumin
½ teaspoon ground pepper, (I like a blend of black, red, white and green)
2 cups vegetable stock, (And if you don’t make this yourself, then more on that down the line)
2-3 cups of water (start with 2 cups and see if you need more)
Put beans, 2 cups of water, and the tomatoes into a crock pot or large soup pot over medium heat. Stir often, and as soon as this comes up to heat, reduce so that it is on a low simmer.
Lightly brush your bell peppers, chiles, and corn with olive oil, salt and pepper. Place ‘em on a baking pan whole and slide that onto a fairy high rack with your oven on broil. Keep an eye on the peppers and chiles and rotate them as they blacken and blister; don’t let your corn burn; it needs to be turned faster and pulled before the chiles are done! When the peppers and chiles are done all around, pull them out and let them cool enough to touch. Remove stems, seeds and veins and rough chop; slice the kernels off the corn and use your cob for compost.
Pour a few tablespoons of olive oil in a skillet or sauté pan and let it get nice and hot. Toss in your carrot first, let it sauté for a couple minutes and then add your onions and sauté until starting to caramelize. Reduce your heat to medium and add the garlic, cilantro, diced and roasted peppers, chiles and corn. Add the veggie stock and all spices to your liking, (Those amounts are a decent starting point to middle ground volume; do more or less as you please!)
As this gets up to a simmer, throw it all into the big pot and let the flavor marriage begin!
Vegan Cornbread
2 cups coarse yellow corn meal
1 cup unbleached all-purpose flour
2 teaspoon baking powder
1/3 cup canola oil
2 tablespoons honey
2 cups soy milk
2 teaspoons apple cider vinegar
½ teaspoon salt
Preheat your oven to 350. Lightly oil a 10 x 10 baking pan.
Whisk soy milk and vinegar together well.
In a second bowl, combine the corn meal, flour, baking powder and salt.
Add oil and honey to the wet mix. Whisk for a few minutes, until air bubbles form in the mix.
Pour wet into dry and blend gently but thoroughly with a spatula.
Pour batter into your pan and bake for 30-35 minutes, until a toothpick inserted into the center comes out clean.
Tuesday, March 8, 2011
Checking in with the Squeedunks
This just in from Christie and Grant, (AKA Neighborhood Gardens), in scenic Hackensack, MN:
Hi Big E (and the Delightful M)!
Sounds like you are having good fun in the Northwest. This is just a question about the blog. Is there any way you can develop an index of recipes and topics, such as: cruising through for M's crisp recipe. Of course, that did mean I found a number of other things I was meaning to try out, etc., so that ain't all bad, but...
Have been busy transplanting; yup, have the peppers, eggplants, toms, etc. going and in a couple weeks we will heat the greenhouse and move them to bigger quarters. If you are in the NW, Texas, or probably anywhere else in the US this might not be news, but up here it is!
C and G Up North
Well my friends, yes we ARE! M just shines around the kids and Grandbaby; wonderful to see her so happy, also instructive for moi...
As for the blog, the answer is a BIG yes! Am actively creating the next generation of this here thing: The next generation will feature enhanced search functions, databases for recipes, herbs and seasonings, technique and basics, and some other cool stuff as well - Not sure how long it will take me, but I'm on it and working diligently, so not too long - Stay tuned and thanks for the update!
Oh, and as for those far northern starts, how about a few pics for the blog?
E & M, from northwest Washington State, where it's raining, gray and cold, (Imagine that!)
Monday, March 7, 2011
Status Check!
Greetings from the great Northwest! M and I are up visiting family, (My Ma and Sis and our boys, including, of course, our wonderful daughter-in-law Miranda our very first Grand daughter, Ivy!), doing some cooking, and sniffing out new recipes; gonna have some great seafood options for y'all upon our return! Will have some pretty cool news then as well; pretty exciting if things pan out as they may - We will certainly keep you posted, so stay tuned!
In the meantime, I am online and checking email, so if a question or recipe request comes up, shoot me a line!
E & M, from Bellingham, WA
P.S. Check out the new link to Skar Art, Joe and Miranda's wonderful site!
In the meantime, I am online and checking email, so if a question or recipe request comes up, shoot me a line!
E & M, from Bellingham, WA
P.S. Check out the new link to Skar Art, Joe and Miranda's wonderful site!
Wednesday, February 23, 2011
Leftovers III - The Final Frontier
So, we did wild rice and chicken and a wonderful meal, then we had more chicken in a nice salad for the first leftover flight, and that was killer too, but...
Open the hangar door and what do we find on day 3? Still more leftovers! OK, there are two viable schools of thought here:
1. Make less food, dummy, and
2. USE what you make when you make a lot!
Of the two options, I like to use what we make; maybe it's the restaurant roots, maybe it's just ojos grandes, but either way, we CAN make a concerted effort to not waste food and still enjoy fresh ideas each and every night.
Here's a for instance for y'all: We love comfort food, (Obviously), and fairly often, this takes the form of casseroles. In so doing, we discovered that if we make a cream-based sauce concoction, (Our faves are the venerable macaroni and cheese, and tuna-noodle, which we will cover here shortly!), we tend to eat it all up within a day or so: On the other hand, when our invention is tomato based, although they're really yummy, we don't tend to eat those so quickly, which can lead invariably to waste. The solution? We make the same big initial batch, but instead of putting everything in one casserole dish, we use ramekins, and freeze about half for later dining pleasure. Simple you say? Sure is; so why did it take us years to figure that out? (Don't answer, that was a rhetorical question...)
Anyway, here are standing before the open fridge, and what we have left is wild rice. So what to do that's fun and yummy and new?

Soufflé, of course!
I LOVE eggs, not the least because they're so versatile. Using eggs as a light, fluffy component to bind and enrich other great stuff, (Read wild rice and great cheese in this case), is just a wonderful thing indeed. It looks tough, but it's not really, and it's always a joy to pull out of the oven!
Cheese Rice Souffle
The basics of soufflé cooking are really quite simple - Again, it may look fancy and difficult, but it ain't - Dive in and have some fun!
4 eggs
1 cup milk
3 tbsp flour
3 tbsp butter
1 1/2 cups cheese
Couple of key things for y'all - First and foremost, pull all your ingredients an hour or so before you start to cook; you want this stuff at room temp. Secondly, don't dilly dally while you're doing this - Because we're going to beat egg whites with a lot of air, which is critical to the pretty appearance we're after, you need to keep things moving along - Not frantic, just steady as she goes!
Preheat your oven to 350° F.
OK, you're going to do a slightly heavier version of a classic white sauce, AKA béchamel, if you want to get all continental about it.) So we start with a roux, which is nothing more than fat and flour in equal measure: Your butter goes into a sauce pan until it's melted over medium-low heat. Add your flour and whisk the two together into a paste. Now it's time to decide whether you like your roux dark or light; if it's light, (Less of a browned butter taste, naturally), we'll move right into adding milk. If you prefer things a bit darker, as we do, then allow that butter and flour mixture to gain a little color first. Add your milk VERY slowly, so that you’re never outpacing the elasticity of the flour/butter mixture. Once it’s nicely whisked together, remove the pan from the heat and set it aside for a few minutes to cool.
Note: Classic béchamel has some seasoning involved, FYI; usually onion, salt and pepper. In this application, we’re gonna forgo further seasoning until we got to building our final soufflé mix.
Separate your eggs and put them into small bowls as follows:
3 egg yokes
4 egg whites
Now, as for cheese, what you use is what floats your boat! We used 2 year old WSU Cougar Grate Gold, and incredible white cheddar produced at the Washington State University Creamery, (Which you can find and buy online just like we do, and if you got any jones for killer cheese, you WILL do that!). Grate your cheese.
Whisk your egg yolks until they’re well blended. Now add cheese and egg yolks to your white sauce and mix them together well.

Question you might just ask at this juncture: “OK, Ace; we’re making a soufflé, and I’ve heard of soufflé dishes – How important is that?
EXCELLENT question! Answer; pretty important! A soufflé dish has straight sides, and believe it or not, the wonderful thing y’all are about to make needs and wants those straight sides to climb up. The good news is, they’re available all over the place and cheap. You can also use straight sided ramekins to make individual soufflés, as we did.
Prep a soufflé dish by lightly buttering the sides and bottom, and then lightly coat that with flour: The butter keeps the little beast from sticking, and the flour gives ‘em something to grab ahold of as they make their way to the top!
Put your egg whites in a non-reactive bowl, (I like glass best), and start beatin’ ‘em. You want to beat your whites stiff, but not dry.


‘Nuther Question Time! “Stiff but not dry? I thought we were making food here?”
Good point – You’ll see a number of instructions down the line for the level of egg yolks to be beaten to; soft peak, stiff, dry among them. Once you do this a few times, it WILL make sense to you! When beating, you’re really just adding air to the egg whites; they have a great affinity for holding air in a matrix. As you incorporate more and more air, the volume of the whites increases and the consistency goes from a definite liquid to more of something that starts to look solid to you. At the low end of this semi-solid phase, if you take a beater or whisk and flip a little pit of the mixture straight up, it’ll kind of hold a little peak, like a soft serve ice cream cone, kinda – That’s a soft peak. Beat a bit more and the mix will start to look almost rigid; do the flip again and your little peak will stand pretty much straight up – That’s a stiff peak. Beat it more and you’ll notice that the mix doesn’t glisten as much, and starts to look kinda like Styrofoam; that’s dry – Get the picture? Good; onward!

OK, now your whites are to the stiff peak phase. Poke a finger into your wet mix, (The sauce, egg and cheese stuff), and make sure it’s not hot to the touch; we want to mix, not cook at this phase, OK?
Gently scoop your egg whites into the wet mix and, using a spatula, GENTLY fold the white thoroughly into the mix. Remember, we spent a bunch of time and effort getting all that air in there, so don’t let it out – Slow and easy on the folding!

Pour your soufflé mix into your prepared pan or ramekins. Slide ‘em gently into a middle rack in the oven and bake at 350° F for 20 to 30 minutes. They should rise to and over top of your dishes and look amazing when you open that oven; that said, remember what happened to our popovers? It happens. To everyone. Some time. DON’T worry if they’re not picture perfect, ‘cause they’re gonna be perfectly delicious and there’s always next time!


Enjoy!
Open the hangar door and what do we find on day 3? Still more leftovers! OK, there are two viable schools of thought here:
1. Make less food, dummy, and
2. USE what you make when you make a lot!
Of the two options, I like to use what we make; maybe it's the restaurant roots, maybe it's just ojos grandes, but either way, we CAN make a concerted effort to not waste food and still enjoy fresh ideas each and every night.
Here's a for instance for y'all: We love comfort food, (Obviously), and fairly often, this takes the form of casseroles. In so doing, we discovered that if we make a cream-based sauce concoction, (Our faves are the venerable macaroni and cheese, and tuna-noodle, which we will cover here shortly!), we tend to eat it all up within a day or so: On the other hand, when our invention is tomato based, although they're really yummy, we don't tend to eat those so quickly, which can lead invariably to waste. The solution? We make the same big initial batch, but instead of putting everything in one casserole dish, we use ramekins, and freeze about half for later dining pleasure. Simple you say? Sure is; so why did it take us years to figure that out? (Don't answer, that was a rhetorical question...)
Anyway, here are standing before the open fridge, and what we have left is wild rice. So what to do that's fun and yummy and new?
Soufflé, of course!
I LOVE eggs, not the least because they're so versatile. Using eggs as a light, fluffy component to bind and enrich other great stuff, (Read wild rice and great cheese in this case), is just a wonderful thing indeed. It looks tough, but it's not really, and it's always a joy to pull out of the oven!
Cheese Rice Souffle
The basics of soufflé cooking are really quite simple - Again, it may look fancy and difficult, but it ain't - Dive in and have some fun!
4 eggs
1 cup milk
3 tbsp flour
3 tbsp butter
1 1/2 cups cheese
Couple of key things for y'all - First and foremost, pull all your ingredients an hour or so before you start to cook; you want this stuff at room temp. Secondly, don't dilly dally while you're doing this - Because we're going to beat egg whites with a lot of air, which is critical to the pretty appearance we're after, you need to keep things moving along - Not frantic, just steady as she goes!
Preheat your oven to 350° F.
OK, you're going to do a slightly heavier version of a classic white sauce, AKA béchamel, if you want to get all continental about it.) So we start with a roux, which is nothing more than fat and flour in equal measure: Your butter goes into a sauce pan until it's melted over medium-low heat. Add your flour and whisk the two together into a paste. Now it's time to decide whether you like your roux dark or light; if it's light, (Less of a browned butter taste, naturally), we'll move right into adding milk. If you prefer things a bit darker, as we do, then allow that butter and flour mixture to gain a little color first. Add your milk VERY slowly, so that you’re never outpacing the elasticity of the flour/butter mixture. Once it’s nicely whisked together, remove the pan from the heat and set it aside for a few minutes to cool.
Note: Classic béchamel has some seasoning involved, FYI; usually onion, salt and pepper. In this application, we’re gonna forgo further seasoning until we got to building our final soufflé mix.
Separate your eggs and put them into small bowls as follows:
3 egg yokes
4 egg whites
Now, as for cheese, what you use is what floats your boat! We used 2 year old WSU Cougar Grate Gold, and incredible white cheddar produced at the Washington State University Creamery, (Which you can find and buy online just like we do, and if you got any jones for killer cheese, you WILL do that!). Grate your cheese.
Whisk your egg yolks until they’re well blended. Now add cheese and egg yolks to your white sauce and mix them together well.
Question you might just ask at this juncture: “OK, Ace; we’re making a soufflé, and I’ve heard of soufflé dishes – How important is that?
EXCELLENT question! Answer; pretty important! A soufflé dish has straight sides, and believe it or not, the wonderful thing y’all are about to make needs and wants those straight sides to climb up. The good news is, they’re available all over the place and cheap. You can also use straight sided ramekins to make individual soufflés, as we did.
Prep a soufflé dish by lightly buttering the sides and bottom, and then lightly coat that with flour: The butter keeps the little beast from sticking, and the flour gives ‘em something to grab ahold of as they make their way to the top!
Put your egg whites in a non-reactive bowl, (I like glass best), and start beatin’ ‘em. You want to beat your whites stiff, but not dry.
‘Nuther Question Time! “Stiff but not dry? I thought we were making food here?”
Good point – You’ll see a number of instructions down the line for the level of egg yolks to be beaten to; soft peak, stiff, dry among them. Once you do this a few times, it WILL make sense to you! When beating, you’re really just adding air to the egg whites; they have a great affinity for holding air in a matrix. As you incorporate more and more air, the volume of the whites increases and the consistency goes from a definite liquid to more of something that starts to look solid to you. At the low end of this semi-solid phase, if you take a beater or whisk and flip a little pit of the mixture straight up, it’ll kind of hold a little peak, like a soft serve ice cream cone, kinda – That’s a soft peak. Beat a bit more and the mix will start to look almost rigid; do the flip again and your little peak will stand pretty much straight up – That’s a stiff peak. Beat it more and you’ll notice that the mix doesn’t glisten as much, and starts to look kinda like Styrofoam; that’s dry – Get the picture? Good; onward!
OK, now your whites are to the stiff peak phase. Poke a finger into your wet mix, (The sauce, egg and cheese stuff), and make sure it’s not hot to the touch; we want to mix, not cook at this phase, OK?
Gently scoop your egg whites into the wet mix and, using a spatula, GENTLY fold the white thoroughly into the mix. Remember, we spent a bunch of time and effort getting all that air in there, so don’t let it out – Slow and easy on the folding!
Pour your soufflé mix into your prepared pan or ramekins. Slide ‘em gently into a middle rack in the oven and bake at 350° F for 20 to 30 minutes. They should rise to and over top of your dishes and look amazing when you open that oven; that said, remember what happened to our popovers? It happens. To everyone. Some time. DON’T worry if they’re not picture perfect, ‘cause they’re gonna be perfectly delicious and there’s always next time!
Enjoy!
Sunday, February 13, 2011
Round II – USE Those Leftovers!
Well, as often happens with great food, you find you’re cookin’ hungry and maybe, just maybe, find your ojos were bigger than your estómago and you end up making a lot more than one meal’s worth of grub!
What to do? Well, there’s always snacking ‘till it’s gone, but come on, gang, let’s get organized and do something cool with grits that good, huh? When it comes to stuff like we made the other night, you gotta give it a little pizzazz again, even for the reruns, and most importantly, it’s gotta be easy, ‘cause you already paid your dues with the original prep, right? Right! So, no problema, let’s use the stuff that will go bad first, (Chicken), and make something good and cool to look at for tonight.
Chicken Salad with Cheese Biscuits, (Sort of...)
First and foremost, make it EASY! A nice green salad to start, cut your remaining chicken breast into rounds, and off you go!

We cut a grapefruit into supremés, which sounds hoity toity, but simply means we took a sharp paring knife and cut the beautiful meat away from all the fibrous stuff and skin, leaving perfect bites of very tart, juicy fruit – They look cool and taste even better.
For the dressing, we went with a grapefruit vinaigrette, by substituting freshly squeezed grapefruit juice for vinegar, then whisking that into olive oil at a 2:1 ratio of oil to juice, and adding a dash of salt and pepper.

Biscuits were made by a basic popover recipe, but they did not rise all that well, as you can see… (WHAT? You made something that DIDN’T TURN OUT LIKE YOU THOUGHT IT WOULD? And you not only ATE IT, but SHOWED IT TO US??!) In a word, yup. Fact is, best laid plans of mice and men, yadda yadda; I’ve made thousands of popovers, but sometimes they don’t pop – In this case, the most likely culprit is fat, (AKA the WSU aged cheddar we used in the little buggers); fat and popovers don’t get along all that well, hence the lousy rise. That said, they still taste fantastic and to throw them away would be criminal; that goes for MOST of your future cooking oopses – If it tastes good, eat it, and unless you’re trying to impress somebody really important, serve it – We’re all human, we all make mistakes, and some of those are still delicious, OK?
Popover batter is dang near crepe batter; the diff between the two is steam – That’s what lifts popovers high and leaves crepes flat as a, well… pancake, of course, (Sorry…). We’ll cover popovers thoroughly soon, and make them right to boot, so stay tuned – In this case, they didn’t rise well, so they become… Cheese biscuits, (Ever watch Chopped on the Food Channel? Ever see a pro have something go wrong and change the name of what they were serving as a result?)


This was a delicious, fresh meal; the veggies and tart dressing were a perfect counterpoint to the savory chicken.


Welcome to cooking...
What to do? Well, there’s always snacking ‘till it’s gone, but come on, gang, let’s get organized and do something cool with grits that good, huh? When it comes to stuff like we made the other night, you gotta give it a little pizzazz again, even for the reruns, and most importantly, it’s gotta be easy, ‘cause you already paid your dues with the original prep, right? Right! So, no problema, let’s use the stuff that will go bad first, (Chicken), and make something good and cool to look at for tonight.
Chicken Salad with Cheese Biscuits, (Sort of...)
First and foremost, make it EASY! A nice green salad to start, cut your remaining chicken breast into rounds, and off you go!
We cut a grapefruit into supremés, which sounds hoity toity, but simply means we took a sharp paring knife and cut the beautiful meat away from all the fibrous stuff and skin, leaving perfect bites of very tart, juicy fruit – They look cool and taste even better.
For the dressing, we went with a grapefruit vinaigrette, by substituting freshly squeezed grapefruit juice for vinegar, then whisking that into olive oil at a 2:1 ratio of oil to juice, and adding a dash of salt and pepper.
Biscuits were made by a basic popover recipe, but they did not rise all that well, as you can see… (WHAT? You made something that DIDN’T TURN OUT LIKE YOU THOUGHT IT WOULD? And you not only ATE IT, but SHOWED IT TO US??!) In a word, yup. Fact is, best laid plans of mice and men, yadda yadda; I’ve made thousands of popovers, but sometimes they don’t pop – In this case, the most likely culprit is fat, (AKA the WSU aged cheddar we used in the little buggers); fat and popovers don’t get along all that well, hence the lousy rise. That said, they still taste fantastic and to throw them away would be criminal; that goes for MOST of your future cooking oopses – If it tastes good, eat it, and unless you’re trying to impress somebody really important, serve it – We’re all human, we all make mistakes, and some of those are still delicious, OK?
Popover batter is dang near crepe batter; the diff between the two is steam – That’s what lifts popovers high and leaves crepes flat as a, well… pancake, of course, (Sorry…). We’ll cover popovers thoroughly soon, and make them right to boot, so stay tuned – In this case, they didn’t rise well, so they become… Cheese biscuits, (Ever watch Chopped on the Food Channel? Ever see a pro have something go wrong and change the name of what they were serving as a result?)
This was a delicious, fresh meal; the veggies and tart dressing were a perfect counterpoint to the savory chicken.
Welcome to cooking...
Friday, February 11, 2011
That’s Wild with a Capital W, Boyo…
There’s a lot of stuff out there that gets called wild rice, but a facts a fact, and here’s the fact about that, jack: For the real skinny on wild rice, I turned to my friend and supplier, Christy Hohman-Caine from the great northern wilds of Minnesota, eh? She explains thusly:
“Wild rice (Zizania palustris) is an annual grass that ripens about the end of August and into Sept. Processing requires drying the rice, then parching it, then removing the hull. It can be done strictly by hand, using a kettle (big ceramic pots pre-euro trade) and a paddle to parch and taking the hull off by "jigging" or "dancing" the rice in a pit. More industrial processors around here are not exactly high tech, but they may use propane to heat big metal barrels that have paddles (instead of people) to keep the rice tossing. Even then, the rice man checks each batch as it parches, because each strain is different and the amount of moisture may be different too. You gotta know what you're doing.
Here’s a good article on the process showing the range from family processing to larger processors. Even the largest around here is not like the processing that commercial processors do (for paddy rice, like ol’ Uncle Ben's). Check the slideshow with this after you read it. In spite of the names, these are all Indian people.”
By the way, she just tossed that off as a quick email response, gang - See why I love that girl?
So there ya have it! Chances are, if you’re looking to get the genuine article at your local Safersons, it ain’t happenin’. A little poking around online should net what you’re after though.
Suffice it to say that this stuff, real wild rice, is like nothing you’ve ever had before; it’s like good ale versus Super Lite beer; and it’s addictive, once you’ve had it, you’ll never wander yonder again.
We’re gonna do up a nice dish with this as an opener, and then segue into some follow up meals; why, ‘cause if you’re like us, you’ll make too much rice for the first meal and then have a container sitting around that can either get thrown out after a week, or be put to further good use as it should be!
So here goes: Today we cover the Big Kahuna knock out first meal, then on to the leftovers down the line.
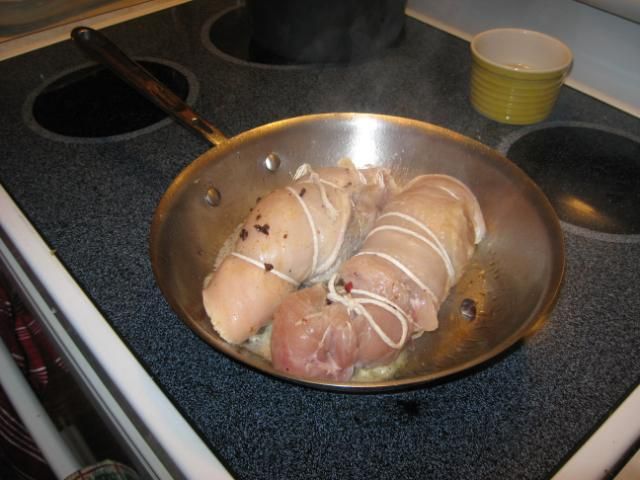
Urb's Chicken Breasts with wild rice, dried cranberries and crushed hazelnuts.
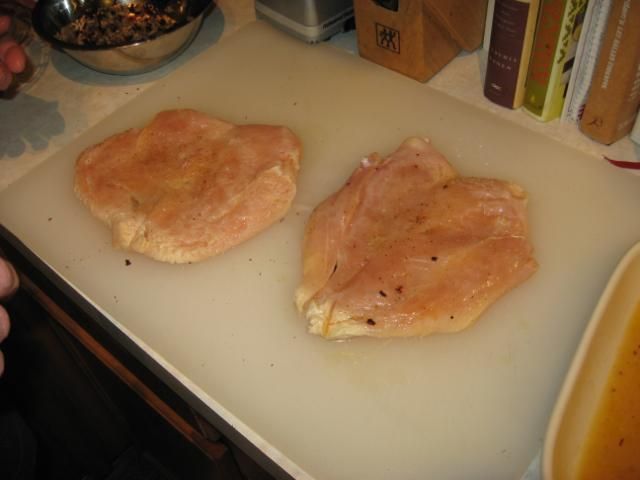
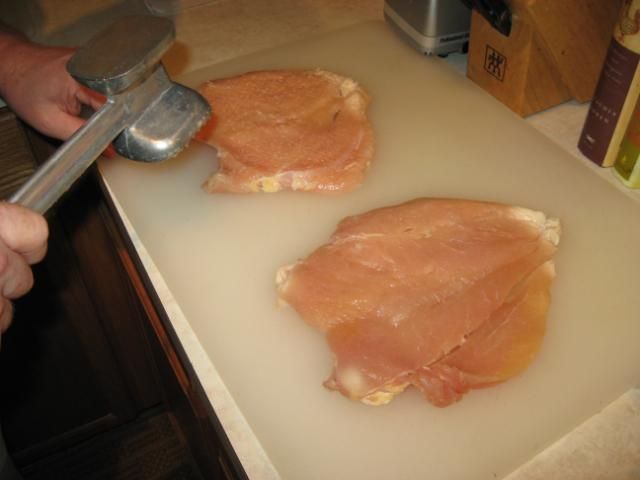
We took some nice natural chicken breasts, skinned and boned ‘em, butterflied ‘em out, and then pounded them a bit so they’re a nice, even thickness. Two points to consider here: One, this may look like fancy pants cookin’, but it ain’t; you could do this in the field if you wanted, (Seriously – Platt and I ate REAL well during our deer hunt – Being out and about does not mean you have to sacrifice good cooking, that’s what chuck boxes were made for…) Secondly, this recipe works even better with wild game; Quail, Pheasant, Partridge, or Dove would all rock with this – The wild rice, dried fruit and nuts with animal is simply the best, (Ever heard of Pemican?). OK, onward!
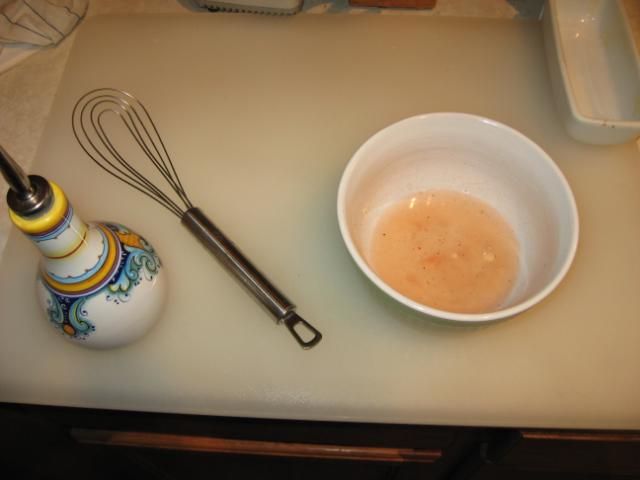
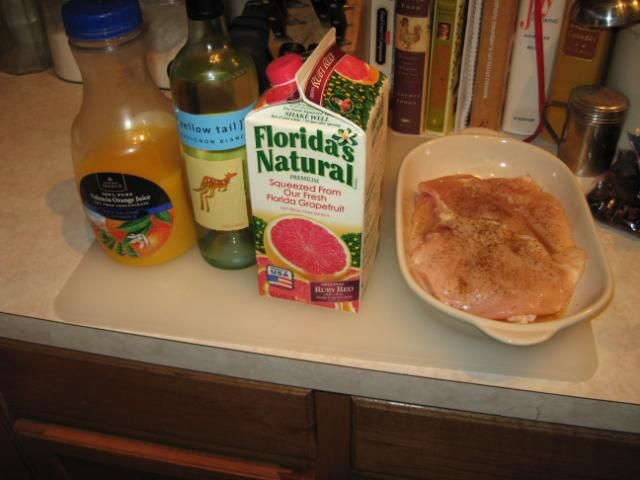
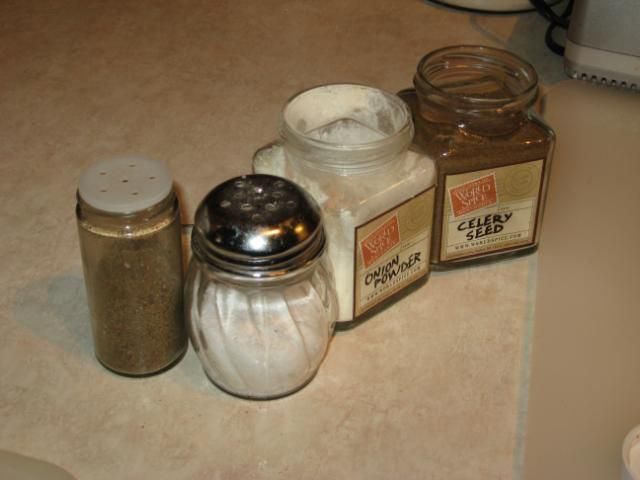
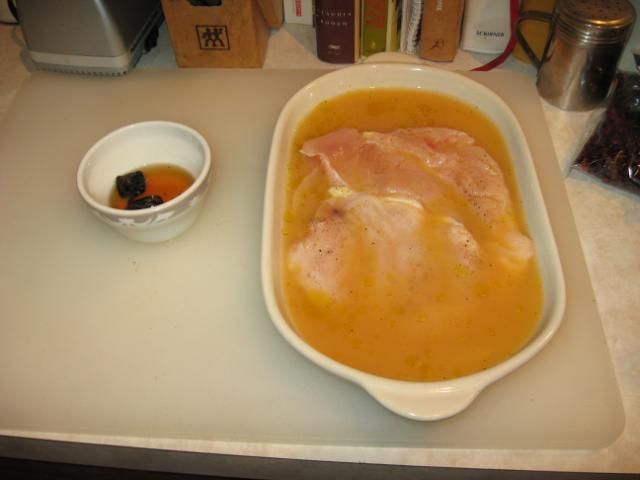
After the flesh is pounded out, (And yes, you should have a meat hammer if you don’t already), we put it in a nice little marinade of white wine, orange and grapefruit juice, with a little salt, pepper, onion powder, and celery seed. Let it sit for about ½ hour, then pull the breasts out and reserve the marinade.
NOTE: As with ALL poultry, always follow safe handling practices with the flesh and everything you use to contain and handle it!
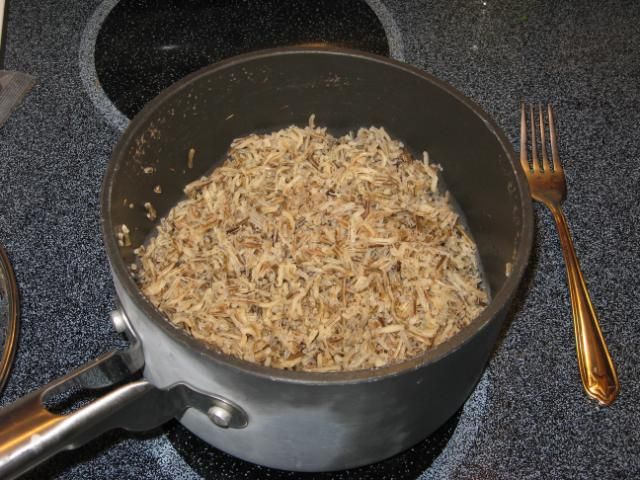
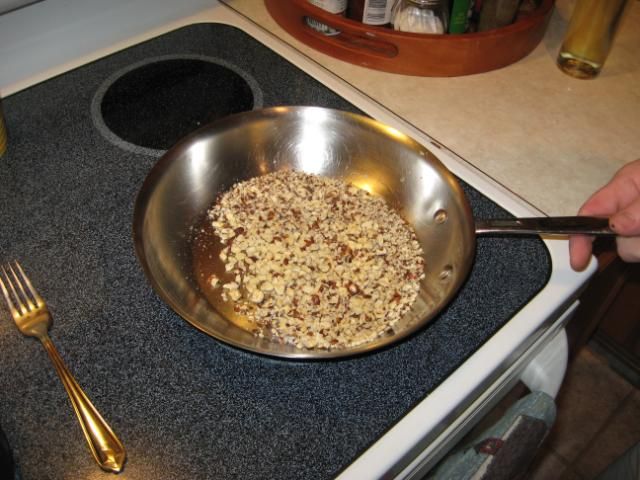
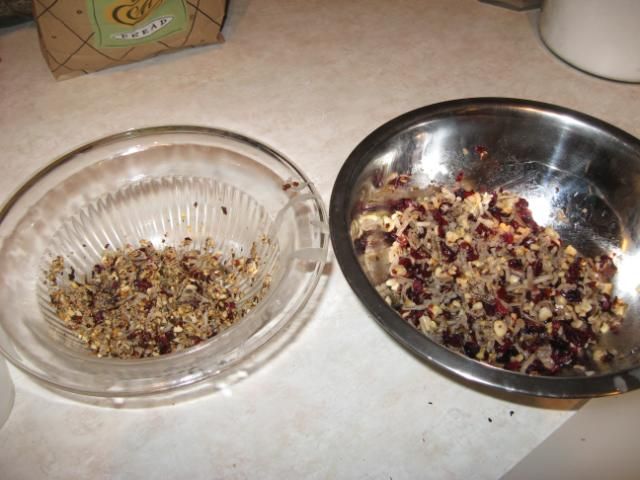
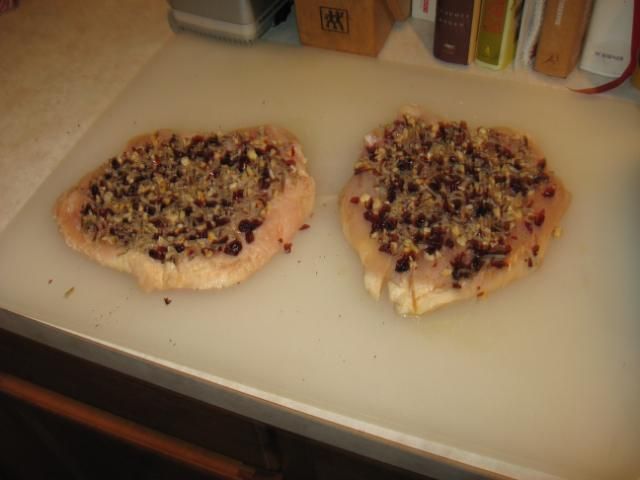
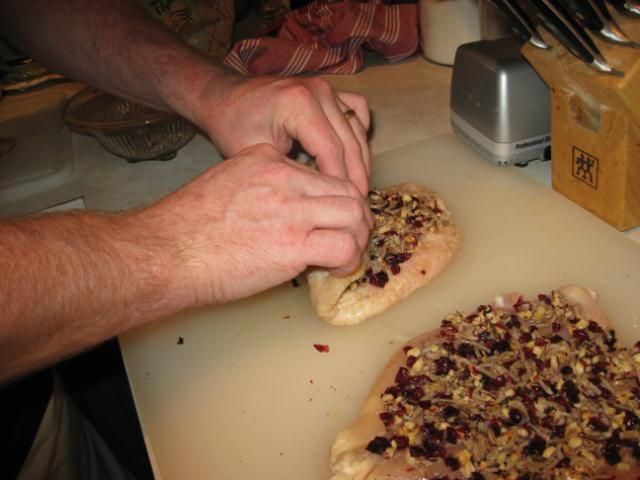
We cooked the wild rice to the slightly dry side, then mixed equal portions of rice, dried cranberries, and chopped hazelnuts, (The hazelnuts were out of season, so we toasted them to get 'em back to a nice, perky condition). I put a spoon or so of bacon fat in the mix, (Everybody’s favorite cheat!), since chicken is lean and a little fat helps everything get together cozy-like; I also rehydrated a couple of our home grown smoked cherry peppers and chopped them into the mix for a nice, smoky taste with a touch of heat. Spread an even layer of the mixture over the meat, and then grab your kitchen twine. Roll the breasts into nice logs and tie them off.
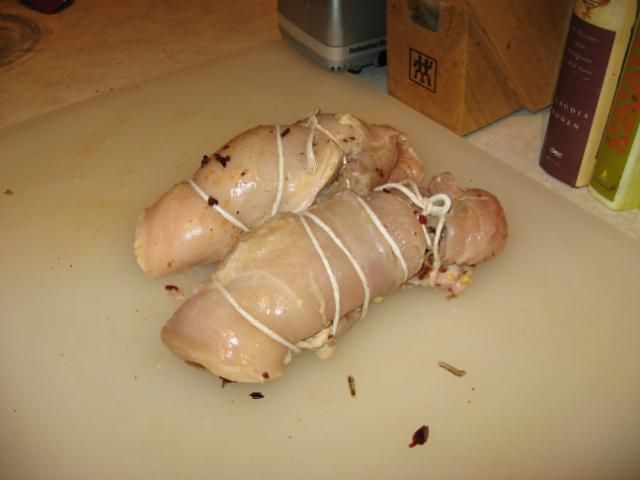
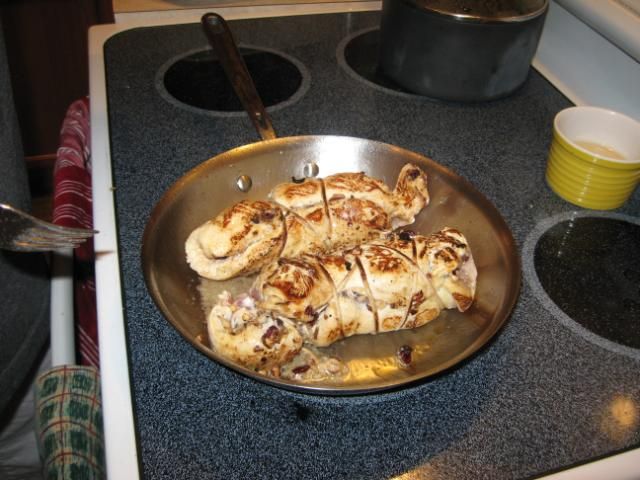
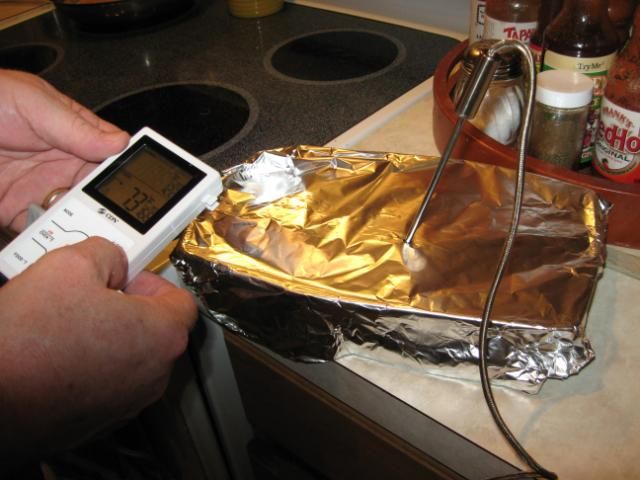
The meat goes into an oiled pan on high heat and is evenly browned; once that’s done, pop ‘em into a baking dish, cover it with foil and toss that into a 350º F oven to finish. We use our schmancy thermometer to make sure we achieve 170º F internal temp, rather than using a timer. We took the remaining rice/cranberry/nut mix and tossed it on top of the breasts.
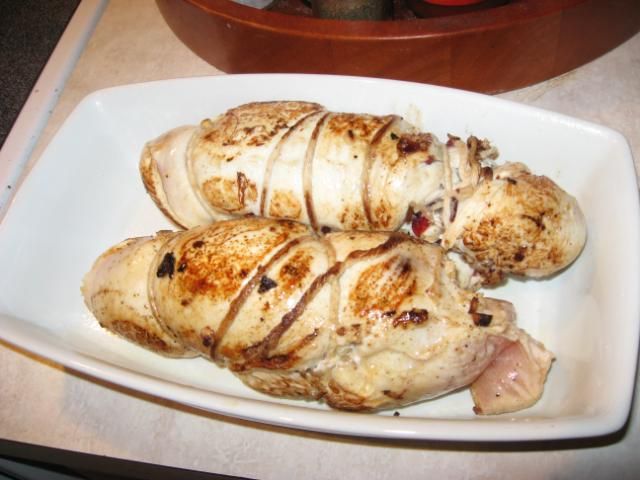
Once it’s done, pull it out and let it rest at least 10 minutes, as it will continue to cook and get to the magic done temp – Remember, NEVER cut flesh that’s just come out of the oven, you’ll guarantee dry and nasty if you do!
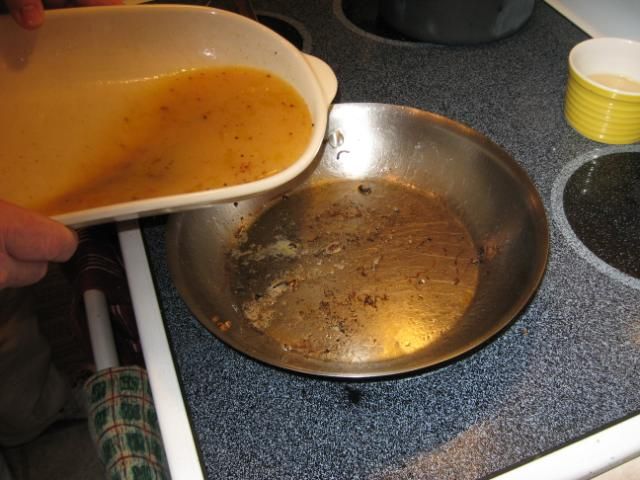
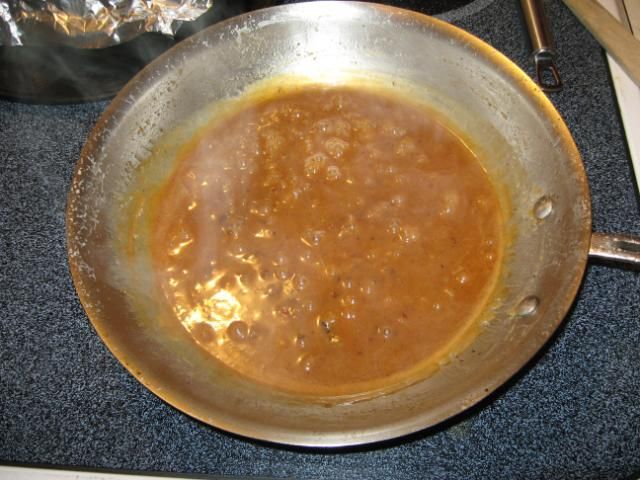
While the chicken is cooking, grab your marinade and use it to deglaze the pan you browned the breasts in. Mix all that up nicely and get the naughty bits off the pan bottom, and then set it on a low simmer to reduce; we took our down to roughly 25% and then added a couple tablespoons of butter, making it syrup-thick so it coats a spoon nicely when tested.
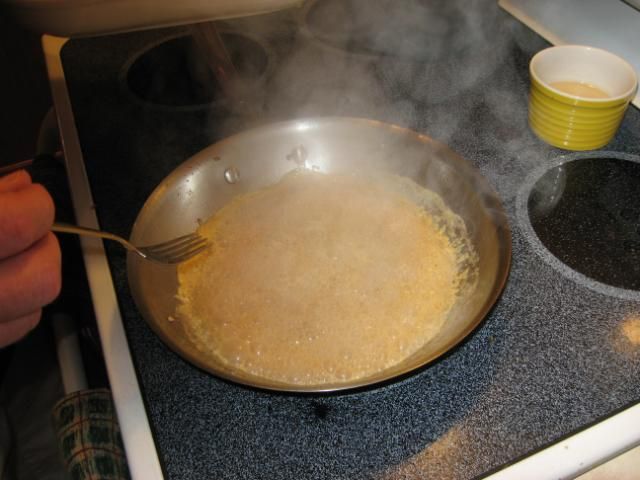
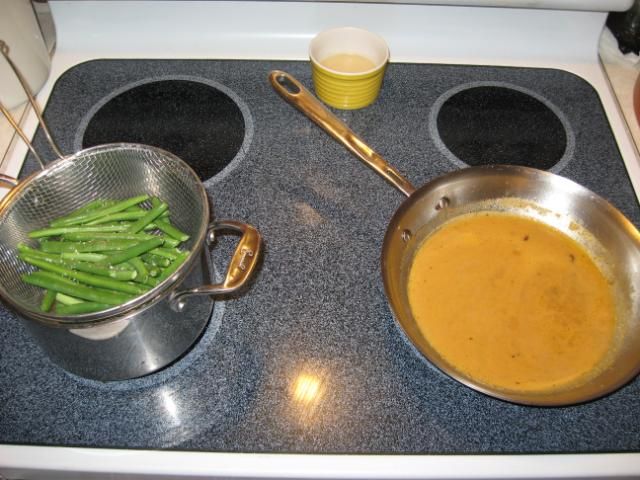
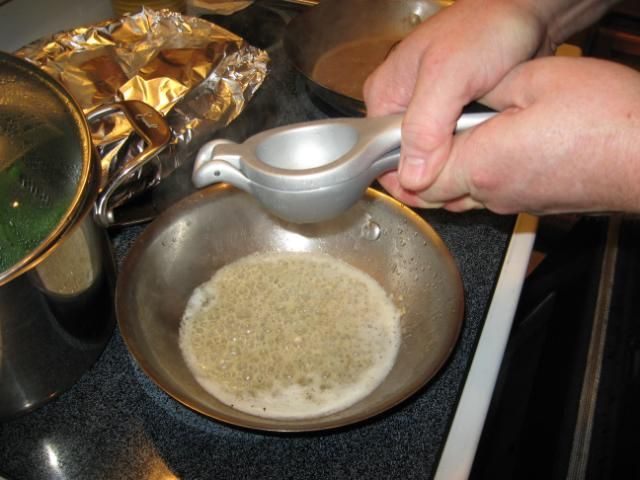
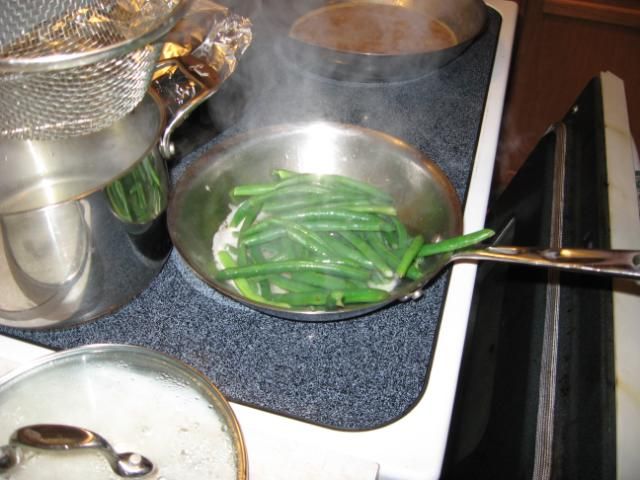
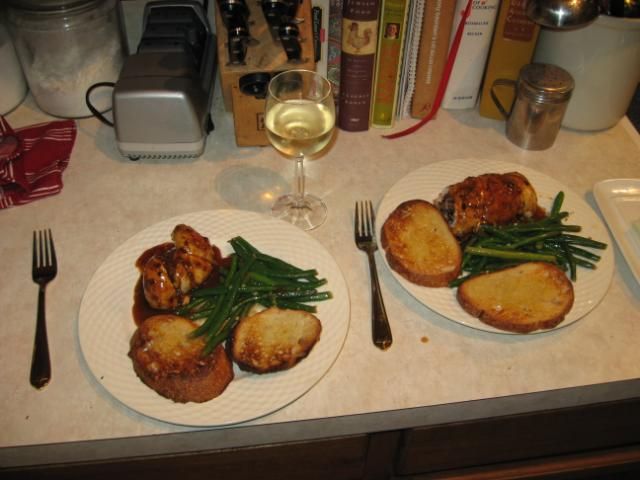
Our accompaniment for this wonderful stuff was nice, fresh green beans with lemon butter, and some Texas toast. Cut nice thick rounds of the rolled breast, (Remembering to take the twine off…), arrange and drizzle with the reduced sauce, and go wild! We had ours with a nice, dry white wine and a cooking show on the tube – fact is, ours looked a LOT better than theirs, and so will YOURS!
Enjoy!
“Wild rice (Zizania palustris) is an annual grass that ripens about the end of August and into Sept. Processing requires drying the rice, then parching it, then removing the hull. It can be done strictly by hand, using a kettle (big ceramic pots pre-euro trade) and a paddle to parch and taking the hull off by "jigging" or "dancing" the rice in a pit. More industrial processors around here are not exactly high tech, but they may use propane to heat big metal barrels that have paddles (instead of people) to keep the rice tossing. Even then, the rice man checks each batch as it parches, because each strain is different and the amount of moisture may be different too. You gotta know what you're doing.
Here’s a good article on the process showing the range from family processing to larger processors. Even the largest around here is not like the processing that commercial processors do (for paddy rice, like ol’ Uncle Ben's). Check the slideshow with this after you read it. In spite of the names, these are all Indian people.”
By the way, she just tossed that off as a quick email response, gang - See why I love that girl?
So there ya have it! Chances are, if you’re looking to get the genuine article at your local Safersons, it ain’t happenin’. A little poking around online should net what you’re after though.
Suffice it to say that this stuff, real wild rice, is like nothing you’ve ever had before; it’s like good ale versus Super Lite beer; and it’s addictive, once you’ve had it, you’ll never wander yonder again.
We’re gonna do up a nice dish with this as an opener, and then segue into some follow up meals; why, ‘cause if you’re like us, you’ll make too much rice for the first meal and then have a container sitting around that can either get thrown out after a week, or be put to further good use as it should be!
So here goes: Today we cover the Big Kahuna knock out first meal, then on to the leftovers down the line.
Urb's Chicken Breasts with wild rice, dried cranberries and crushed hazelnuts.
We took some nice natural chicken breasts, skinned and boned ‘em, butterflied ‘em out, and then pounded them a bit so they’re a nice, even thickness. Two points to consider here: One, this may look like fancy pants cookin’, but it ain’t; you could do this in the field if you wanted, (Seriously – Platt and I ate REAL well during our deer hunt – Being out and about does not mean you have to sacrifice good cooking, that’s what chuck boxes were made for…) Secondly, this recipe works even better with wild game; Quail, Pheasant, Partridge, or Dove would all rock with this – The wild rice, dried fruit and nuts with animal is simply the best, (Ever heard of Pemican?). OK, onward!
After the flesh is pounded out, (And yes, you should have a meat hammer if you don’t already), we put it in a nice little marinade of white wine, orange and grapefruit juice, with a little salt, pepper, onion powder, and celery seed. Let it sit for about ½ hour, then pull the breasts out and reserve the marinade.
NOTE: As with ALL poultry, always follow safe handling practices with the flesh and everything you use to contain and handle it!
We cooked the wild rice to the slightly dry side, then mixed equal portions of rice, dried cranberries, and chopped hazelnuts, (The hazelnuts were out of season, so we toasted them to get 'em back to a nice, perky condition). I put a spoon or so of bacon fat in the mix, (Everybody’s favorite cheat!), since chicken is lean and a little fat helps everything get together cozy-like; I also rehydrated a couple of our home grown smoked cherry peppers and chopped them into the mix for a nice, smoky taste with a touch of heat. Spread an even layer of the mixture over the meat, and then grab your kitchen twine. Roll the breasts into nice logs and tie them off.
The meat goes into an oiled pan on high heat and is evenly browned; once that’s done, pop ‘em into a baking dish, cover it with foil and toss that into a 350º F oven to finish. We use our schmancy thermometer to make sure we achieve 170º F internal temp, rather than using a timer. We took the remaining rice/cranberry/nut mix and tossed it on top of the breasts.
Once it’s done, pull it out and let it rest at least 10 minutes, as it will continue to cook and get to the magic done temp – Remember, NEVER cut flesh that’s just come out of the oven, you’ll guarantee dry and nasty if you do!
While the chicken is cooking, grab your marinade and use it to deglaze the pan you browned the breasts in. Mix all that up nicely and get the naughty bits off the pan bottom, and then set it on a low simmer to reduce; we took our down to roughly 25% and then added a couple tablespoons of butter, making it syrup-thick so it coats a spoon nicely when tested.
Our accompaniment for this wonderful stuff was nice, fresh green beans with lemon butter, and some Texas toast. Cut nice thick rounds of the rolled breast, (Remembering to take the twine off…), arrange and drizzle with the reduced sauce, and go wild! We had ours with a nice, dry white wine and a cooking show on the tube – fact is, ours looked a LOT better than theirs, and so will YOURS!
Enjoy!
Saturday, January 22, 2011
YIPE!
A THOUSAND MEA CULPAS for being so remiss on entries!
Out of the last 25 days I've worked at the cafe, 60% have been closing shifts, and I'm afraid that has taken it's tole on my energy level!
There IS light at the end of the tunnel though, and we'll be back to regularly scheduled entries afore too long - DO NOT ADJUST YOUR LAPTOP! The problem is NOT with your computer!
;-)
E & M
Tuesday, January 4, 2011
NGKGChef now printer friendly!
Criminy, I swear, sometimes I am SO slow!
A new follower pointed out that each post in this here blog aughta be printer friendly, seeing as they ARE recipe based - (Gee Eben, ya think?)
Anyway, BIG THANKS, Ginnie, for the heads up, and it's done - Each post now has a printer friendly/PDF button at the bottom, for your convenience and the great relief or trees everywhere!
Saturday, January 1, 2011
Quiche a la Urban Monique
Welcome, friends, welcome to 2011! M and I have been blessed this holiday season with each other’s company for 2 whole days in a row, not only at Christmas but here at New Years as well. For me, that means amble reasons to cook for the love of my life; who could ask for anything more?
Breakfast is what we love best and that’s where I do some of my best work. So, for the first entry of 2011, I’m going to share a recipe-in-progress with you that I’ve been working on for the better part of a year. This is not the final form it will take, but it is incredibly good, fun to make, very impressive visually and unbelievably delicious. Ladies and gents, I give you the potato crusted quiche.
Quiche is a member of the custard family, of course, home of everything from crème brûlée to, the savory breakfast sub-species, which includes frittatas, tortas and quiche, among other goodies. Eggs are quite simply a perfect food, and quiche is the best possible savory application I can think of.
As with all things custard, there are a few little touches that will make the difference between good and great; they are:
1. Bring your eggs and cheese out with enough lead time to have them pretty close to room temperature before you mix and cook.
2. Scald your milk before you mix – In a sauce pan, medium high heat, until tiny bubbles form right around the very edges of the milk, then take it off the heat and let it cool a bit
3. Blend, blend, blend! When you combine your egg-milk mixture, the more it is blended, the smoother your custard will be – Use a boat motor if you’ve got one, or a stand mixer or blender of you don’t.
Urban’s Potato-Crusted Quiche
Pre-prep for the crust, the night before you’re gonna cook this up, grate about 2 cups of your favorite hash brown potato; Russets are most traditional, but any high-starch potato will do fine. Put your spuds in a glass storage container and throw that into your freezer overnight.
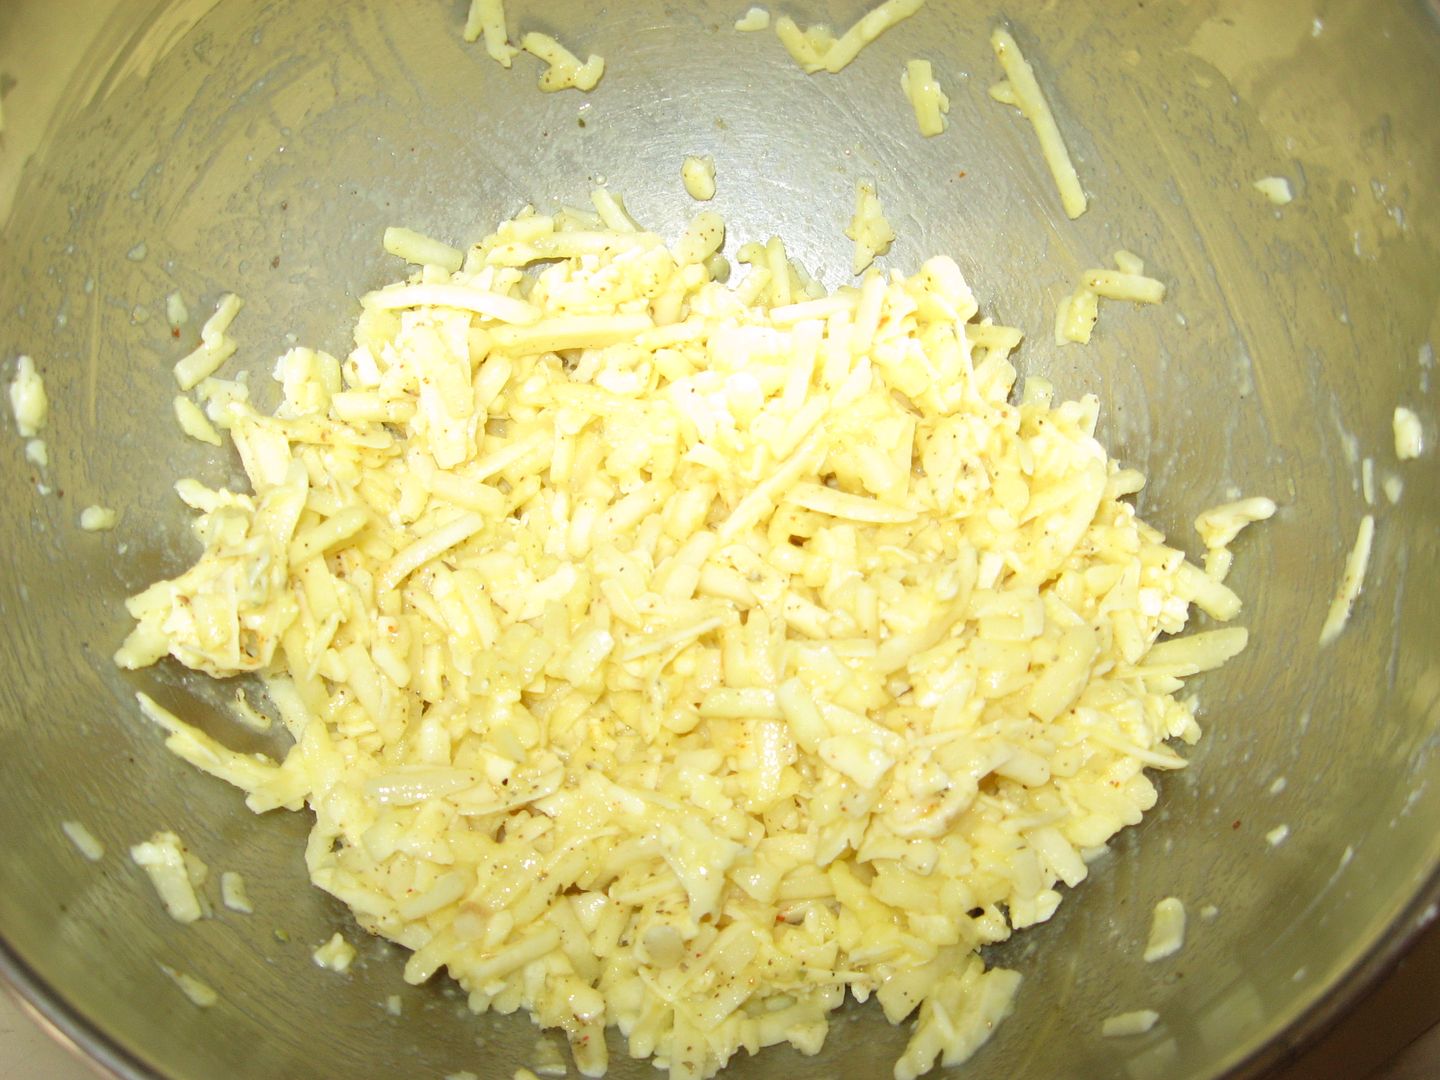
To make the crust, preheat your oven to 450º F. Take your spuds out and break up any clumps; put ‘em in a stainless bowl. Add a cup or so of grated cheese; Swiss or Mozzarella seem to work best, as they seal up the holes better than most others I’ve tried. Finally, whisk 2 eggs well and add them to the mix. Season as you see fit, with a minimum recommendation of salt, pepper and a shot or shake of Tabasco; (for this one, I used those spices plus onion powder, celery seed, garlic, and oregano.)
Mix everything well, and then sling it into a lightly oiled pie pan. You want a layer about ¼” thick, with no holes; raise your sides about ½” higher than the sides of the pan, to account for shrinkage during blind baking.
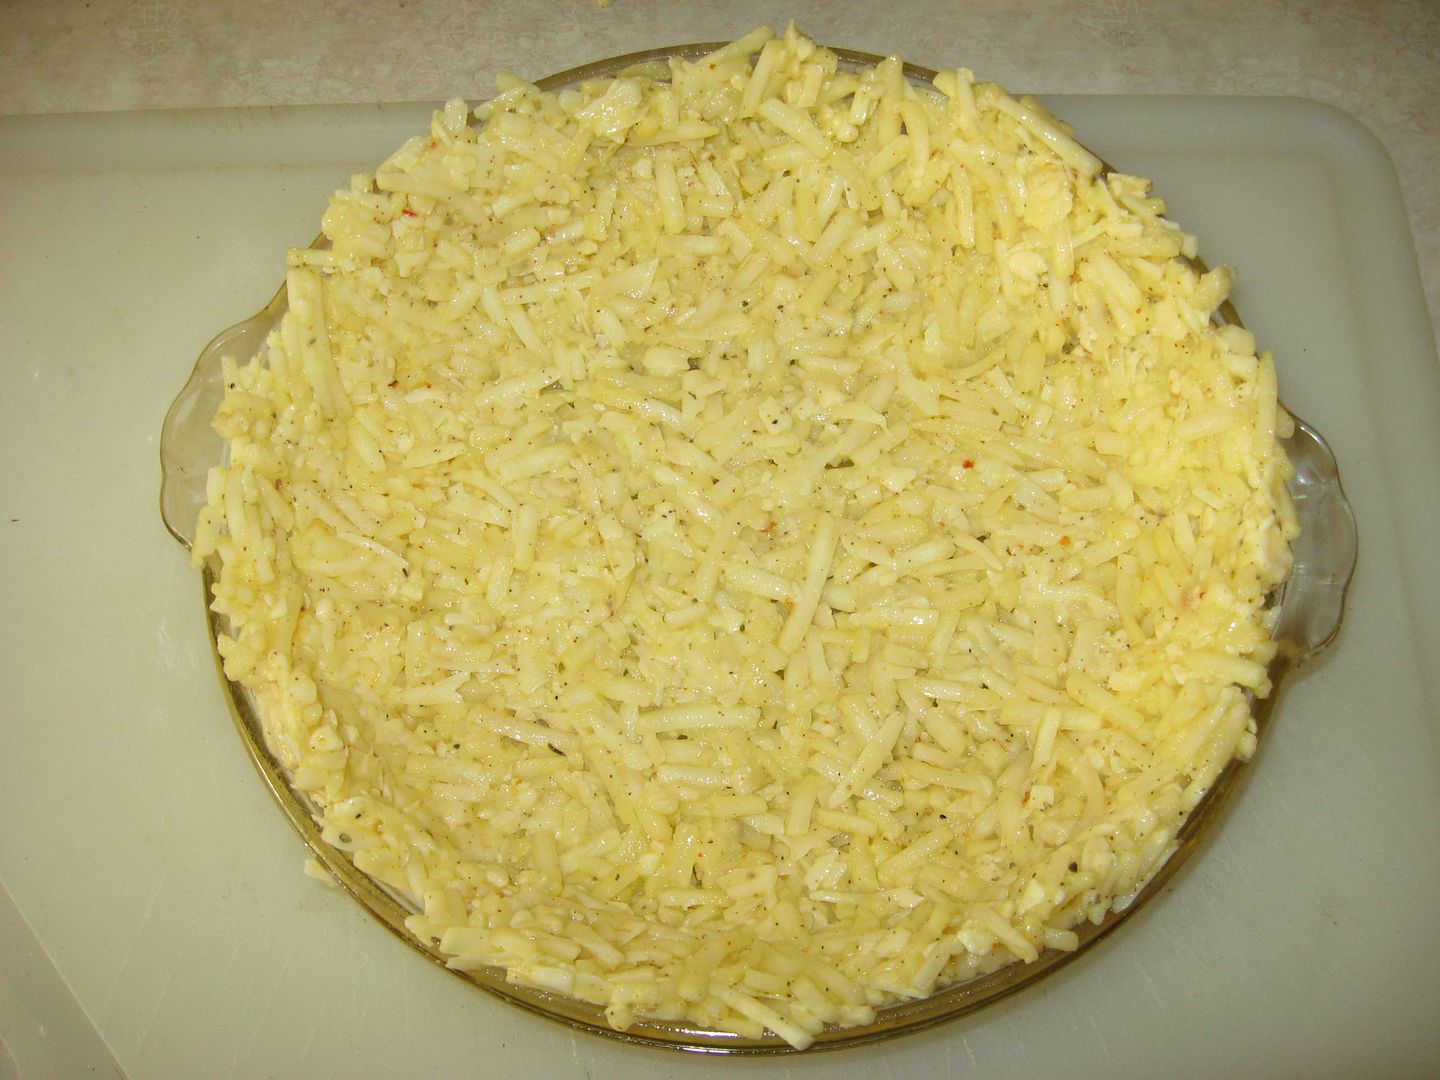
Bake the crust for 15 minutes; remove it from the oven, leaving the temp as it was. Check your crust and fill any holes, build the sides back up, etc, as needed to assure that it will hold the filling well.
Minor aside: Y'all will recall I've spoken of cook books that I use often? Well, those are the ones that get to hang right by cooking central - And here they are...

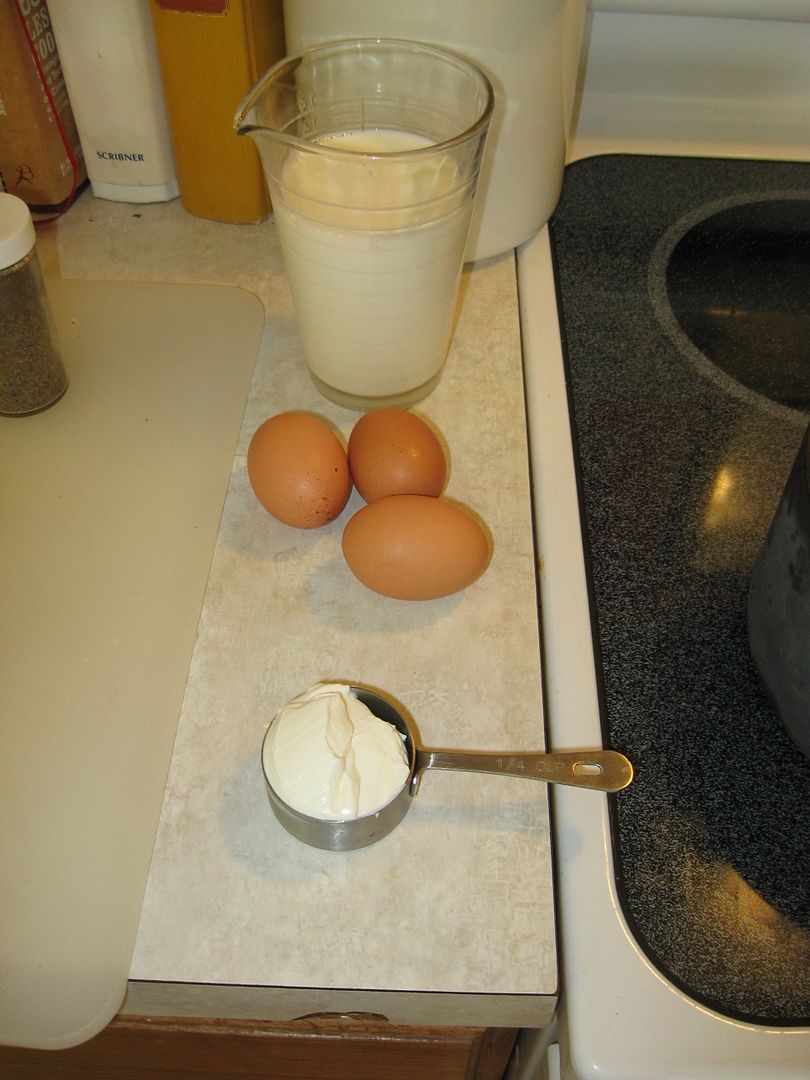
Filling: Scald 2 cups of milk, (Or, as you can see here, I used 1 ¾ cups of 2% milk augmented with ¼ cup of sour cream, to make it as rich and naughty as I think it aughta be – When I have it, I’ll do 3 parts milk to 1 part heavy cream for the same reason). Let your milk cool for a while, (And if you’re impatient, put it in a stainless bowl and roll it around the full perimeter every now and again, which will let the heat absorbing capability of the bowl to your advantage).

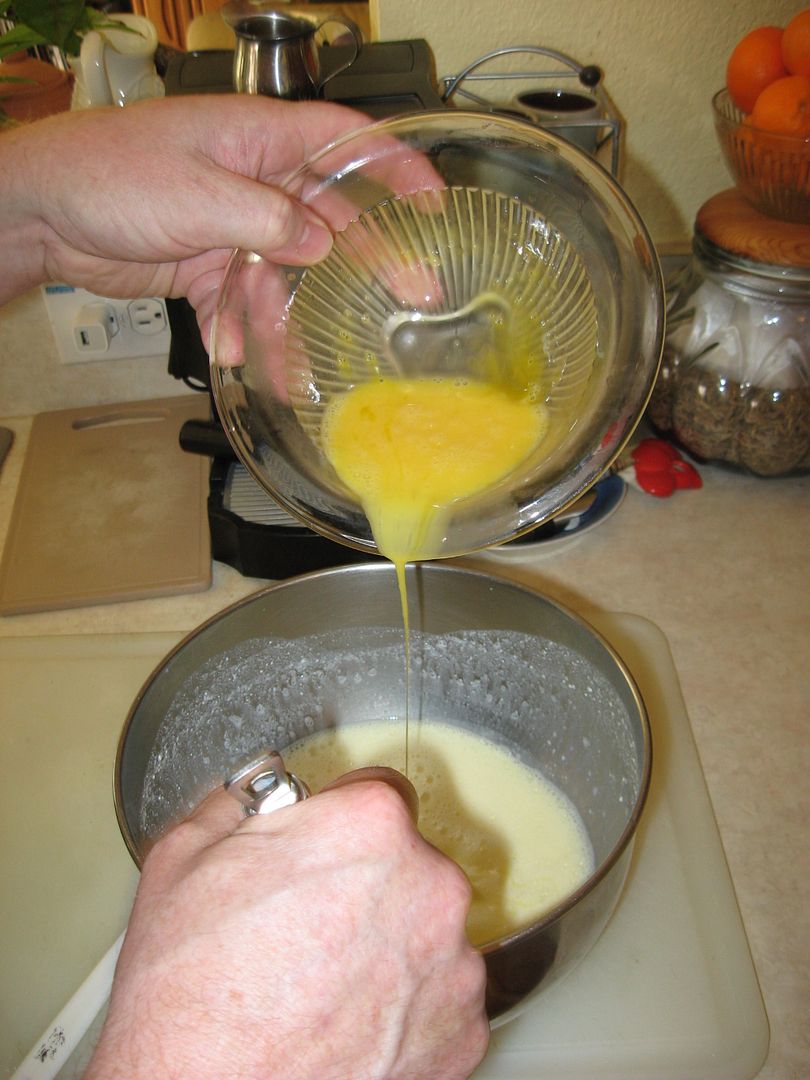
Whisk your eggs well; once the milk has cooled enough so that it won’t instantly cook your eggs, slowly and evenly pour the eggs into the milk, whisking constantly, until you have a nice blend. Motorboat/blend/mix the whole shebang for a good couple of minutes. Season your blend as you see fit; again, salt and pepper are a must – I added Tabasco, garlic, oregano and sage to this one.
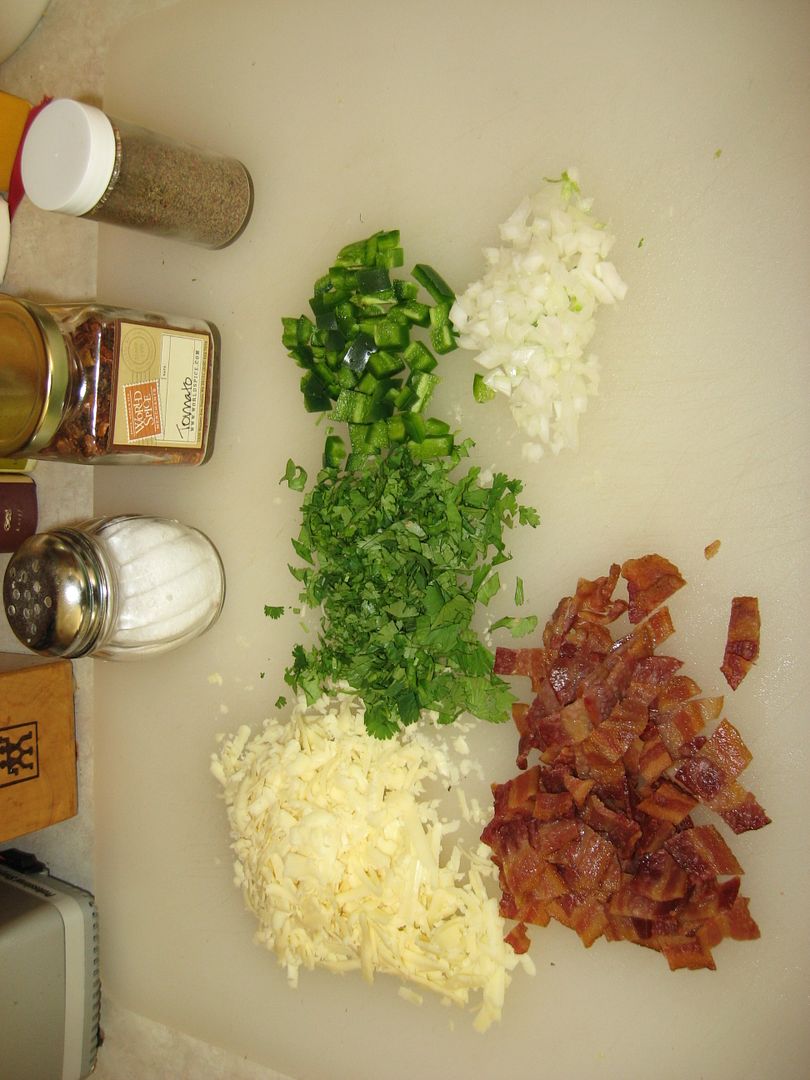
Prep your filling goodies – Classic Quiche Lorraine is simply bacon, Swiss cheese and maybe some chive – I’m working on a southwest theme, so I’ve got Alderwood smoked bacon, aged Washington State University Creamery cheese, jalapeño, cilantro, onion, and dried tomato, (A note on tomato in quiche, etc – I LOVE tomato, but the fact is, even if you core and seed ‘em, they tend to add a lot of water to the mix, and raise a very real possibility of your final product ending up too watery, which is very unappealing – Dried is the answer – They’ll reconstitute beautifully, and add that perfect flavor note without making a swamp outta things.)
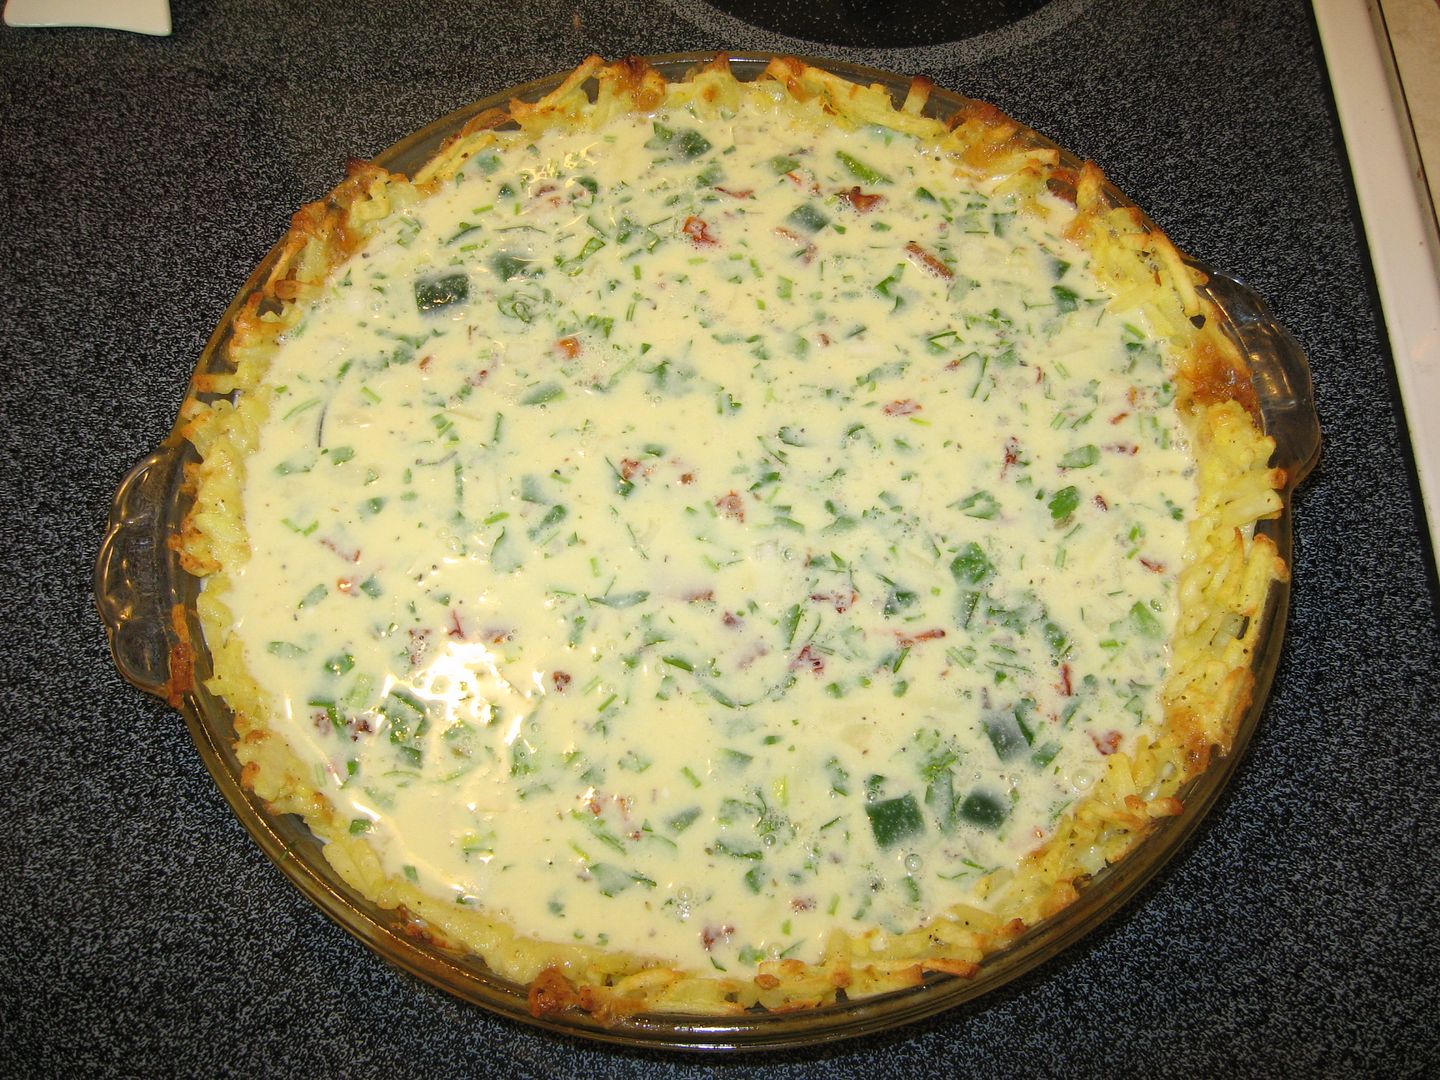
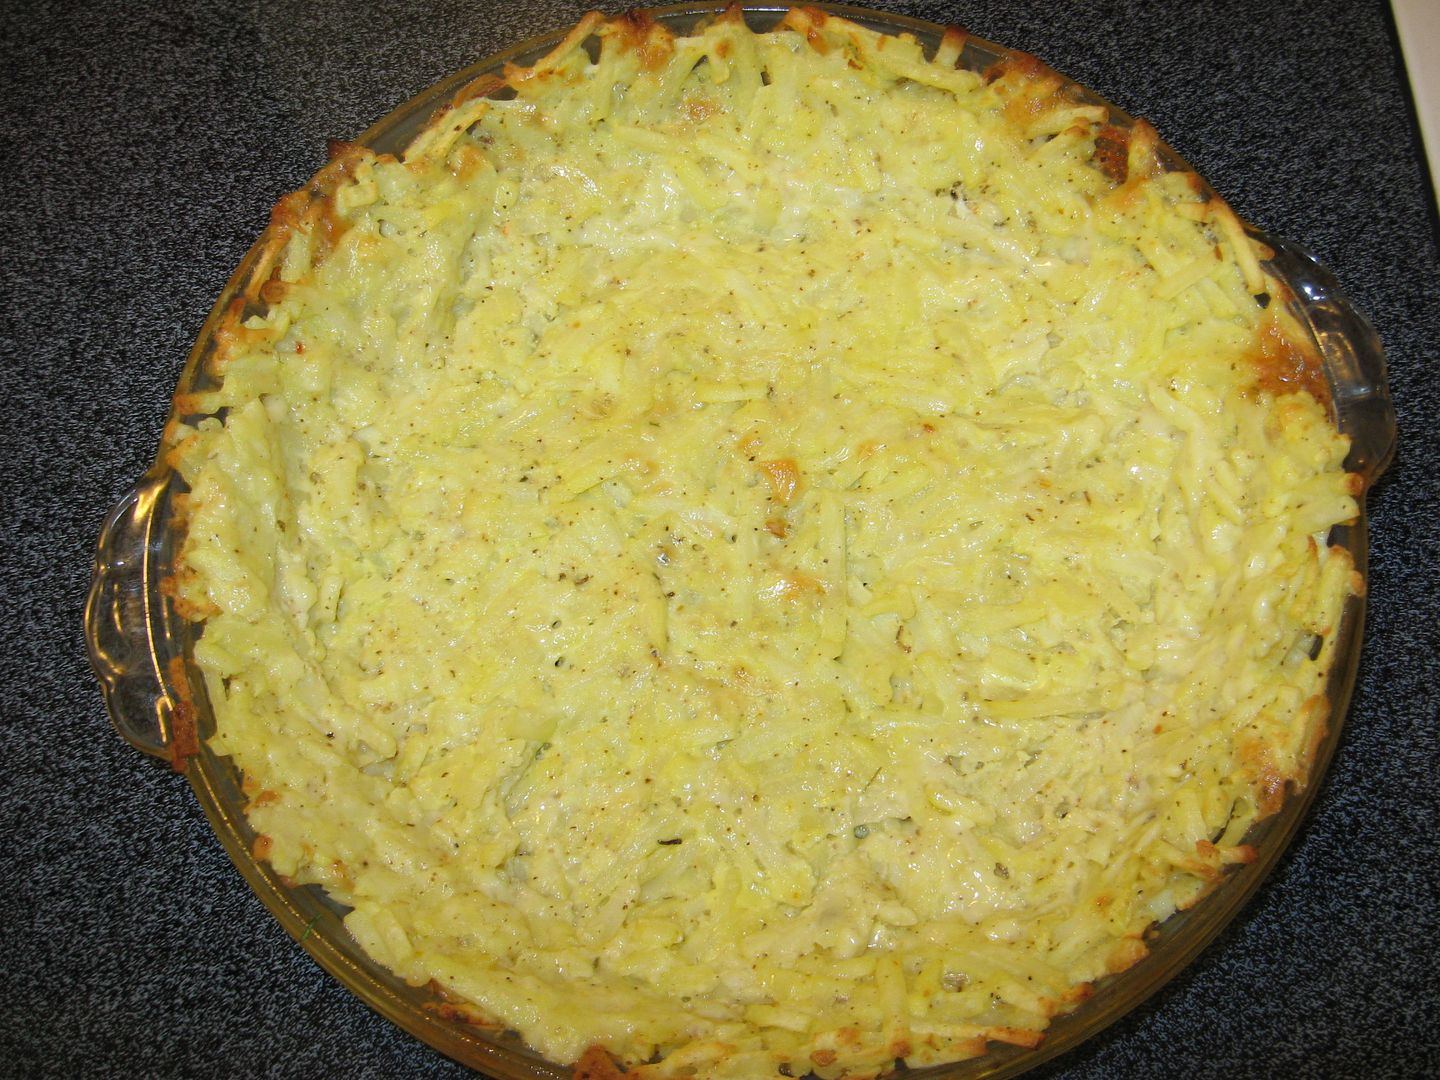
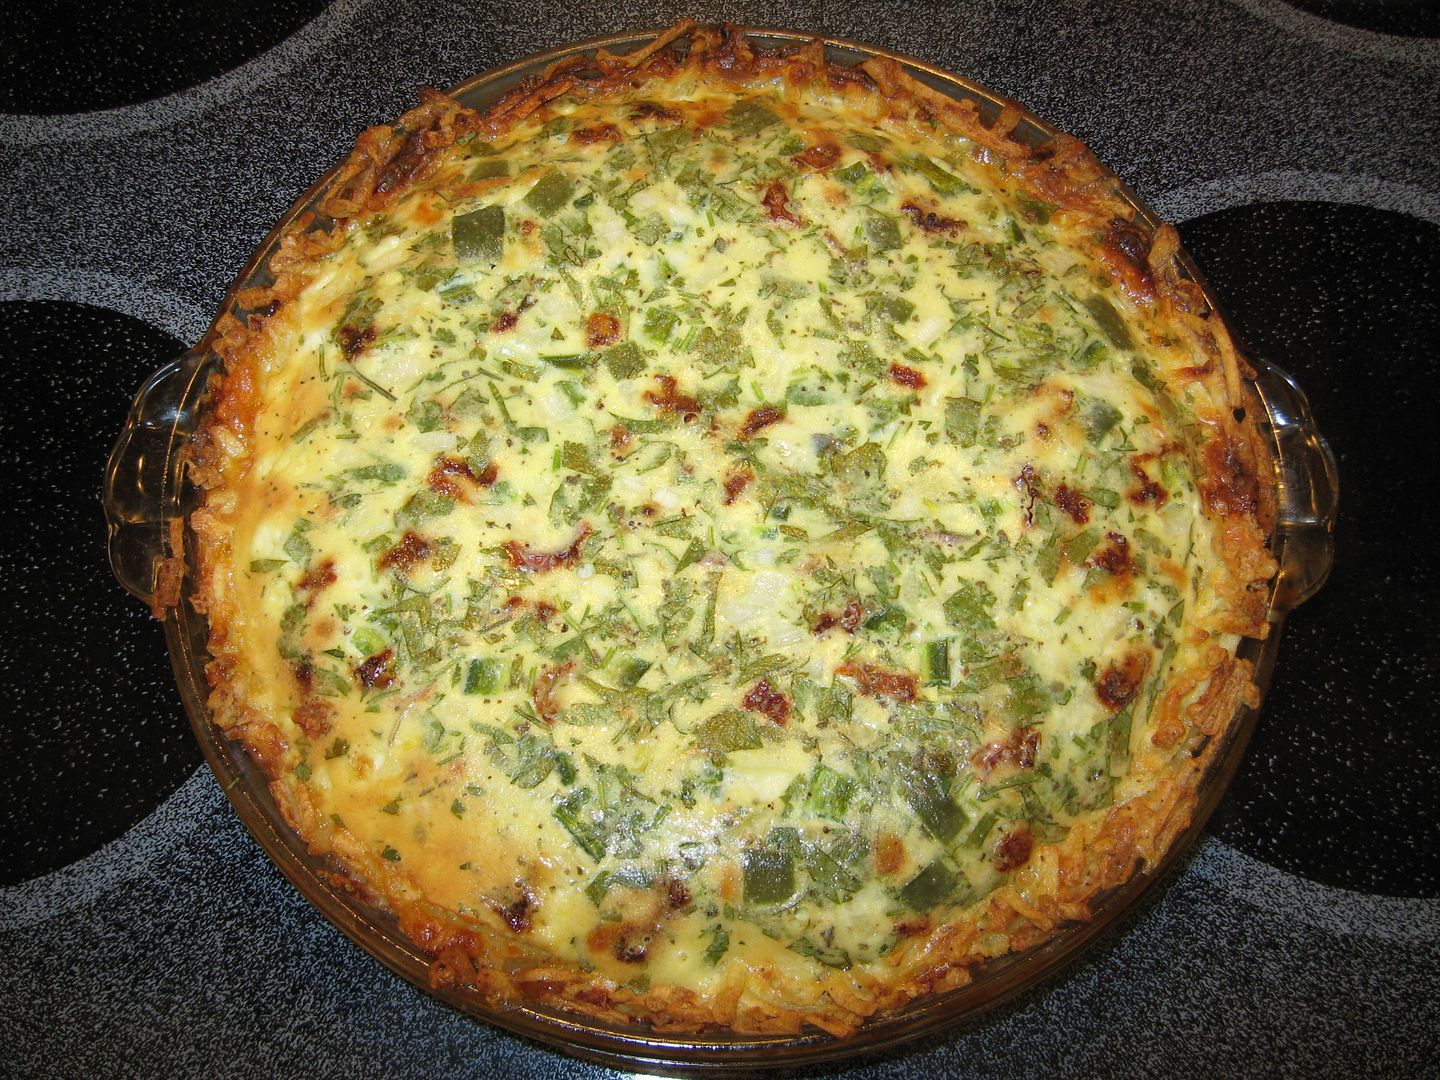
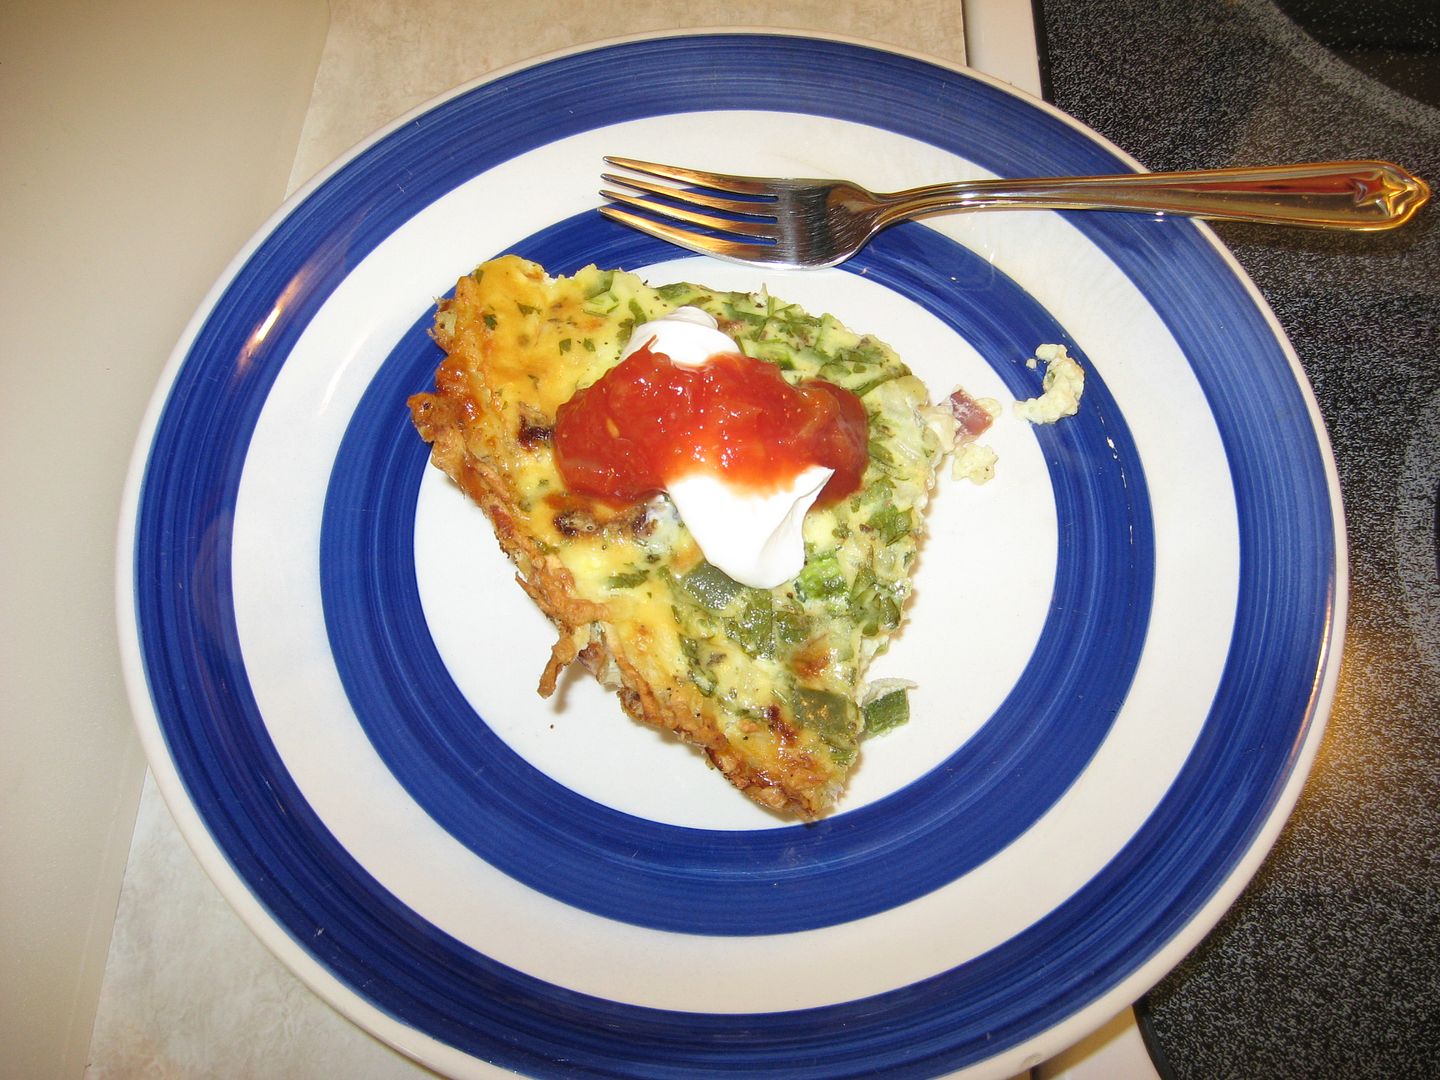
Mix all your goodies into your custard and shove it into the oven. Turn the temp down to 350º F as soon as you load ‘er in. Bake for 40 minutes and then take a look – With a good heavy oven mitt, give ‘er a shake – If the center ain’t jigglin’ like jelly, she’s done; pull it out and let it rest for 10 minutes at stove top. Serve with a spoonful of sour cream and a dash of salsa – You can thank me later…
Breakfast is what we love best and that’s where I do some of my best work. So, for the first entry of 2011, I’m going to share a recipe-in-progress with you that I’ve been working on for the better part of a year. This is not the final form it will take, but it is incredibly good, fun to make, very impressive visually and unbelievably delicious. Ladies and gents, I give you the potato crusted quiche.
Quiche is a member of the custard family, of course, home of everything from crème brûlée to, the savory breakfast sub-species, which includes frittatas, tortas and quiche, among other goodies. Eggs are quite simply a perfect food, and quiche is the best possible savory application I can think of.
As with all things custard, there are a few little touches that will make the difference between good and great; they are:
1. Bring your eggs and cheese out with enough lead time to have them pretty close to room temperature before you mix and cook.
2. Scald your milk before you mix – In a sauce pan, medium high heat, until tiny bubbles form right around the very edges of the milk, then take it off the heat and let it cool a bit
3. Blend, blend, blend! When you combine your egg-milk mixture, the more it is blended, the smoother your custard will be – Use a boat motor if you’ve got one, or a stand mixer or blender of you don’t.
Urban’s Potato-Crusted Quiche
Pre-prep for the crust, the night before you’re gonna cook this up, grate about 2 cups of your favorite hash brown potato; Russets are most traditional, but any high-starch potato will do fine. Put your spuds in a glass storage container and throw that into your freezer overnight.
To make the crust, preheat your oven to 450º F. Take your spuds out and break up any clumps; put ‘em in a stainless bowl. Add a cup or so of grated cheese; Swiss or Mozzarella seem to work best, as they seal up the holes better than most others I’ve tried. Finally, whisk 2 eggs well and add them to the mix. Season as you see fit, with a minimum recommendation of salt, pepper and a shot or shake of Tabasco; (for this one, I used those spices plus onion powder, celery seed, garlic, and oregano.)
Mix everything well, and then sling it into a lightly oiled pie pan. You want a layer about ¼” thick, with no holes; raise your sides about ½” higher than the sides of the pan, to account for shrinkage during blind baking.
Bake the crust for 15 minutes; remove it from the oven, leaving the temp as it was. Check your crust and fill any holes, build the sides back up, etc, as needed to assure that it will hold the filling well.
Minor aside: Y'all will recall I've spoken of cook books that I use often? Well, those are the ones that get to hang right by cooking central - And here they are...
Filling: Scald 2 cups of milk, (Or, as you can see here, I used 1 ¾ cups of 2% milk augmented with ¼ cup of sour cream, to make it as rich and naughty as I think it aughta be – When I have it, I’ll do 3 parts milk to 1 part heavy cream for the same reason). Let your milk cool for a while, (And if you’re impatient, put it in a stainless bowl and roll it around the full perimeter every now and again, which will let the heat absorbing capability of the bowl to your advantage).
Whisk your eggs well; once the milk has cooled enough so that it won’t instantly cook your eggs, slowly and evenly pour the eggs into the milk, whisking constantly, until you have a nice blend. Motorboat/blend/mix the whole shebang for a good couple of minutes. Season your blend as you see fit; again, salt and pepper are a must – I added Tabasco, garlic, oregano and sage to this one.
Prep your filling goodies – Classic Quiche Lorraine is simply bacon, Swiss cheese and maybe some chive – I’m working on a southwest theme, so I’ve got Alderwood smoked bacon, aged Washington State University Creamery cheese, jalapeño, cilantro, onion, and dried tomato, (A note on tomato in quiche, etc – I LOVE tomato, but the fact is, even if you core and seed ‘em, they tend to add a lot of water to the mix, and raise a very real possibility of your final product ending up too watery, which is very unappealing – Dried is the answer – They’ll reconstitute beautifully, and add that perfect flavor note without making a swamp outta things.)
Mix all your goodies into your custard and shove it into the oven. Turn the temp down to 350º F as soon as you load ‘er in. Bake for 40 minutes and then take a look – With a good heavy oven mitt, give ‘er a shake – If the center ain’t jigglin’ like jelly, she’s done; pull it out and let it rest for 10 minutes at stove top. Serve with a spoonful of sour cream and a dash of salsa – You can thank me later…
Subscribe to:
Posts (Atom)